Tag: GML

Making Minesweeper

I haven’t done any game development in years. My enthusiasm for game development took a big hit after I struggled to get used to the changes to the IDE that came when GameMaker Studio went from 1.4 to 2.0. I still don’t like the GMS 2 UI, for many reasons. The GMS 1.4 IDE had plenty of UX issues itself, but I thought that YoYoGames threw out too much when they did their ground-up rewrite of the IDE for the 2.x version. A more incremental UX transition from 1.x to 2.x would have been better.

GameMaker 2 is definitely improved over 1 in many other ways and obviously is the way forward for anyone who wants to work in GameMaker. But GameMaker is still rather limited in certain ways that I’ve always found annoying, and so I had the choice: stick with it, switch to something else, or quit.

I opted to quit. After spending nearly 10 years working in GM8 and then GMS1, I didn’t want to start over learning a new tool, and even switching from GMS1 to GMS2 felt enough like learning a new tool that I didn’t want to do that either.

Having taken all that time off, though, I realize that I still have a desire to make games, provided the experience is itself enjoyable more than it is painful.

In 2020, during pandemic lockdown, out of boredom I made a Snake clone in GameMaker, called Tangle, and it made me happy.

The other day, I was feeling nostalgic for the old built-in Windows game Minesweeper, and discovered that it is not included with Windows 10. You can install a version of Minesweeper from the Microsoft Store for free, and so I tried it, but I hated it. They added all this needless tutorial crap to it that tries to teach you how to play minesweeper by telling you how to do every little thing — stuff that’s easy to figure out on your own, and more enjoyable and rewarding to figure out on your own.

There was a fad in game design over the last 10-20 years to build the manual into the game, in the form of tutorials that told you about how every feature in the game works and how to do every single thing. This is a great idea in theory, but in execution they often prove more annoying than useful. There’s so much built-in gamer knowledge that any experienced player will bring to a new game, from the hundreds of games they’re already familiar with. Such conventional knowledge is just tedious to explicitly spell out for a player.

As well, putting up signposts for every single mechanic is insulting to the player’s intelligence. It’s really more delightful to discover things through exploration and experimentation than it to have the experience of someone holding your hand and telling you when and how to interact with every single thing in the world.

At the same time, in a lot of games I find that I can get frustrated when I can’t figure out how to do something, and I spend a long time trying to figure it out, and it’s not obvious how to “do the thing”. Often the game world is dressed up to look like a realistic world that is full of things we’re familiar with, and we bring assumptions and expectations about those things with us. When we see a chair, we think “I know what that is”. In many games, a chair is just a tile that you can’t interact with, that serves to convey to the player that they’re indoors in a furnished room that has a chair. But there’s nothing to do with the chair. You can’t sit on it. You can’t pick it up and use it to tame a lion. You can’t set it on fire. You can’t break it over someone’s head like a pro wrestler. You can’t move it next to the shelf so you can stand on it and get an object on the top. It’s just a tile that you can’t walk over and have to walk around.

And that’s bullshit. Because it creates the expectation of useless or limited usability in the other objects in the world. You see another object in the game, a chest. You know you can open the chest and find a treasure. You know some chests are locked, and some are trapped or trigger encounters. But even though the chest looks like it is made of wood, you can’t break it up and put the pieces into the fireplace, or set a fire and use it to signal an ally far away on the map, or keep yourself warm in a cold zone.

Games like Legend of Zelda: Breath of the Wild amazed us with the greatly broadened scope of things you could do with nearly every object in the game world that you could see. But that amazement was a break in expectation from what decades of more limited games had trained us to know about interactive game worlds.

Minesweeper is super simple and abstract — about as far away from BOTW as you can get. You can figure out how to play it in a few seconds by clicking. There’s no need for a tutorial mode with achievements to track the things the game explicitly taught you to do. You just go directly to the game play, and you figure it out, all on your own. This makes you feel smarter, empowered, and like the game respects your intelligence. The Microsoft Store version of Minesweeper treats you like a baby, insultingly trying to be helpful and explaining things to you that you already knew, or could have figured out faster without their “help”.

It turns out that the OG minesweeper is available for download if you google for it, and you can still run it on modern day Windows. I don’t know how legal it is to download, but it ain’t like anyone’s making a fortune pirating minesweeper, a game that was given away for free for over a decade with every install of Windows.

So I downloaded it and played it and, you know, it’s just minesweeper, but as I was playing it I was appreciating the design of it, the simplicity, the clear logic that it communicates to the user through its iconography. And I have to say, minesweeper, though utterly commonplace, is really well designed as a game.

I thought, “what the hell” and decided to try to make it myself. I just wanted to see if, A) I could do it, and B) if I could find the experience enjoyable.

It turns out, I could.

I fired up GMS1.4, still installed on my PC, because I didn’t feel like being frustrated by the lack of familiarity with where all the controls in the GMS2 IDE are, and how they all look familiar yet work subtly differently.

Minesweeper is really, really simple. You have a grid of cells. Apart from edge cells, each cell has 8 neighbors. A cell can either have a mine in it or be empty. An empty cell is safe to click on, and doing so reveals how many mines there are among the eight neighbors. You can then use this information to deduce the locations of mines. Once you are sure of a mine’s location, you can right-click the cell to mark it with a flag. This makes the cell safe, because you cannot accidentally set off a mine in a cell that has been flagged. You proceed to traverse the entire minefield, until you have identified and marked all of the mines correctly. If you make a mistake, and click a cell containing a mine, you lose the game. When you lose the game, the entire minefield is revealed, and if you mistakenly flagged any empty cells, those flags are marked with a red X to indicate your error; also the mine you clicked on to end the game is drawn with a red background to indicate it blew up.

There’s a bit more to it than that: a timer, which is used to rank players based on how quickly they can complete the game; a scoreboard of high scores; also the first click in the game is always “free” — the position of the mines is determined after the opening move is played, so that the first cell the player clicks on can always be empty, and thus you always have a chance to win the game — there are no unfair first-move deaths. Finally, there are three different levels of play: beginner, intermediate, advanced, with grids of increasing size and more mines to find at the higher difficulties.

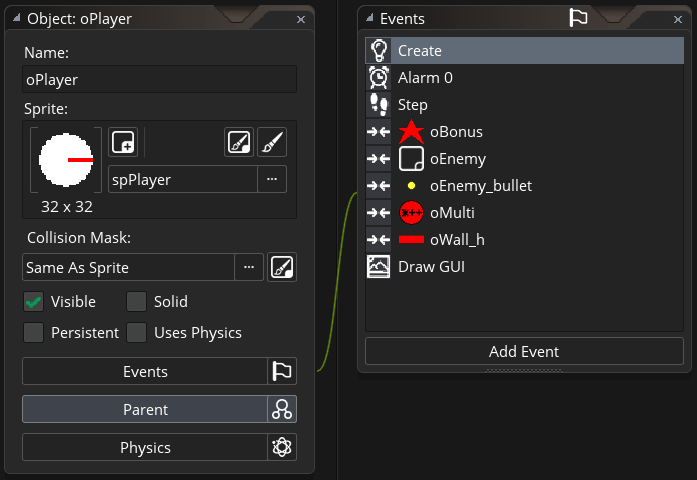
I went with the simplest approach I could think of to build the core features. I didn’t bother with the high score, the timer, or the dashboard at the top of the window. I just implemented a mine cell object, a controller object to handle global state and data, and put most of the logic in the cell object. There’s no actual grid data structure; the mines are simply laid out to create a grid, and each mine cell only needs to be aware of its surrounding eight cells, so that’s all they do. The checks for this don’t care if they’re edge or corner cases, either. They check all 8 positions where a cell could be, and check to see there is one; if so, it checks to see if it is empty or a mine, and if it’s a mine it counts the neighbor and adds it to its tally.

When the game starts, every cell is empty, but when you make your first move, the cell you picked is cleared, and the rest of the mine cells that comprise the field randomly determines whether it contains a mine or not, and the state of the minefield is thereby determined. Thereafter, when you click a cell, if you release the button while the mouse is still over the cell, you trigger the sweep script, which will reveal whether there was a mine or not; if not, the cell will reveal how many mines are in its neighboring cells. If you mouse outside of the cell after clicking on it, and then release the mouse button, the mine cell will not trigger. This allows you to think about the move you are about to make while the mouse button is down, and if you decide that you want to take the move back, you can.

If you click in an empty cell that has 0 neighbors with mines, something special happens. Since the game is telling you that all of the neighbors are safe to clear, it does this for you automatically, saving you the time it would take to clear each neighbor manually. To do this, we check when this condition exists, and if there are 0 neighbors for the current cell, we call the “sweep” function for the eight neighbors. This “sweep” function checks each of the 8 neighbors in the same way, so that if any of them also has zero neighbors with a mine, then all of those neighbors are cleared automatically as well. This results in potentially large areas of the filed being cleared by a single click, and is probably the most fun part of the game.

The game conveys all of its information to the user graphically, through sprites. I created one sprite resource, containing the different states for a mine cell: untouched, cleared, mine, flag, and for the number of neighbors containing a mine. Most of my time spent in development was taken up by drawing the sprites. I wanted to get the colors accurate to classic Minesweeper, and but I didn’t otherwise concern myself too much with exact pixel accuracy or font accuracy. Due to my rusty pixeling skills, it took me a bit before I figured out a good workflow that would enable me to create individual images that had consistently centered positioning and sizing. I ended up deciding on 32×32 pixels for my cell size. This enabled me to create attractive, classic-looking cell graphics.

I did the drawing work in paint.net, in a single 32×32 pixel image with one layer for each sub-image in my sprite. The bottom layer had the grey background and outlining needed to convey a sense of bevel and shadow to create the illusion that the un-cleared cells have a raised tile on them. Within these, I drew very rudimentary flag and mine images, and using the text tool I created labeled numbers for the neighbor counts, colored them accurately. Then I imported the graphic into GameMaker and ordered the sub-images in the sprite in such a way to make the coding as convenient as possible.

Coding took the least amount of time out of everything. It was all pretty easy. The only complexity about the code had to do with some order-of-execution details that I worked through at the game start, because I have each cell determining whether it has a mine in it sequentially, and then I have to have each mine check its neighbors for the presence of a mine, in order to count them. Since the counting can’t start until all the cells determine whether they contain a mine, the neighbor counts don’t take place on the first step of game execution.

I also took a lot of time debugging a logic error that I created for myself unwittingly when I tried to code the recursive checking for neighbors that takes place when the player sweeps through a cell having zero neighboring mine cells. This was tricky because I was using the sprite sub-image to contain state information, which made a lot of sense because the sub-images directly convey this information. But there was one case where there was a state ambiguity: when you left click on an un-checked cell, the sub-image briefly switches to the sub-image I used for the cleared cells, because this gives the appearance of the cell being clicked like a button. When the player releases the left mouse button is when the game checks for mines, and then in the event of a zero-neighbor cell, the recursive check that happens used the sprite sub-image to confirm the state of the cell before doing further checking. Because the neighbor cells aren’t clicked on, they don’t switch from the unchecked sub-image to the cleared sub-image, and thus fail the logic test to see if the sweep check should continue, and thus nothing would happen; the if statment would follow a false branch that would stop the recursion from happening.

I had to sleep on the problem but when I woke up I immediately knew what the problem was and what I needed to do to fix it, which is my absolute favorite way to debug my coding mistakes. The only reason this took me so long to debug was that I assumed the cause of the problem was elsewhere in the code, and I tried everything else I could think of first before giving up and going to bed. But then again, if I didn’t do that, I probably wouldn’t have woken up with the answer in my head.

So now I have a fully functional core minesweeper engine. I don’t have the dashboard, timer, high scores, or variable difficulty levels, but what I have will serve as a good base to add those features.

My little minesweeper.

I enjoyed making it.

GameMaker 2.2 will bring new language features to GML

YoYoGames announced today that the next update release for GameMaker Studio, 2.2, will include a number of long-awaited improvements to the GML programming language.

This is good news for users who have been frustrated by the lack of these features over the years.

Full details are available on the YoYoGames blog.

I am most excited about lightweight objects and chained accessors, which will make it much easier to work with nested data structures.

Lightweight Objects

Lightweight objects are more like what developers who are used to other languages think of as “objects”. In GameMaker, an “Object” had a number of built-in properties and behaviors, which enabled GameMaker Objects to be used in an intuitive way by users working with GameMaker’s engine. A “Lightweight object” is simply a named instance that can hold data, as defined by the user, without the overhead of GameMaker’s built-in properties and Event handlers. Before Lightweight Objects, developers had little choice but to create a traditional GameMaker Object, and make it invisible and use it to store whatever instance variables the game needed to store “somewhere”. This was suboptimal for performance, as these objects didn’t need to have x, y position, or a sprite, or collision mask, or most of the other features that are built-in by default for a traditional GameMaker object. With a lot of data-holder objects in the game, they could impose a enough unnecessary overhead that it could be detrimental to runtime performance.

Chained Accessors

If you’ve worked with GML’s data structures, and ever wanted to be able to store a List inside of a Map, well now you can a lot more easily, thanks to chained accessors. This enhancement to GML’s syntax makes it easier to reference a structure stored inside another structure. Previously, it was a pain to manage nested data structures, requiring convoluted syntax and multiple lines of code.

Other new features

GML will also receive Garbage Collection and an Exception handling system. I don’t know that I’ve ever actually needed either of these. I certainly haven’t missed them in my own GameMaker projects. But they are features of most object-oriented languages, and programmers who are used to having these features will appreciate being able to use them in GML now.

Overall, it’s very good to see the GML language adding these language features.

GML Tetris, a GameMaker Demo project

My latest asset for the GameMaker Marketplace is a Tetris demo. Fully-featured, and configurable, it requires only sound files to be added to complete the project.

It’s meticulously researched, beautifully coded, fully documented, and rigorously tested, and represents approximately 150 developer hours of work, for only $4.99. It’s playable as is, right out of the box. It’s easy to understand the code, easy to configure with simple changes to the code, and modding is encouraged.

A tale of two GML scripts: code optimization through iterative development

Today I wanted to share two versions of a function that I wrote, in order to show how my iterative approach to software development works when I am doing code optimization to improve performance.

This example comes from my iMprOVE_WRAP asset. It’s a function that returns the shortest distance (taking into account the wrap capabilities of the calling object) between the calling instance and a target object.

The first implementation works, in that it correctly does what it’s supposed to do, but I never released it, because I wasn’t satisfied that it was good enough code to ship.

///iw_distance_to_object(target_obj, x1, y1, x2, y2, do_wrap_h, do_wrap_v,)

///@description Returns the distance_to_object from an improve_wrap object calling this function to another instance. 
///Compares all relevant points for the iw_object and returns the nearest distance, taking the wrap range into account.
///@param target_obj id of the target object to determine the distance to.
///@param x1 left x boundary of wrap range
///@param y1 top y boundary of wrap range
///@param x2 right x boundary of wrap range
///@param y2 bottom y boundary of wrap range
///@param do_wrap_h set whether the horizontal wrap is on (true) or off (false)
///@param do_wrap_v set whether the vertical wrap is on (true) or off (false)


//get the distance from the nine virtual positions
//return the shortest distance
var obj = argument[0];
var iw_distance, iw_distance_up, iw_distance_down, iw_distance_left, iw_distance_right, 
    iw_distance_up_left, iw_distance_up_right, iw_distance_down_left, iw_distance_down_right;
var tempx, tempy, shortest;
var x1, y1, x2, y2, range_width, range_height, do_wrap_h, do_wrap_v;

//keep track of original location of target object
tempx = x;
tempy = y;

//set up wrap range
x1 = min(argument[1], argument[3]);
y1 = min(argument[2], argument[4]);
x2 = max(argument[1], argument[3]);
y2 = max(argument[2], argument[4]);
range_width = x2 - x1;
range_height = y2 - y1;

do_wrap_h = argument[5];
do_wrap_v = argument[6];

//check distances
//check center
iw_distance = distance_to_object(obj);

if do_wrap_h && do_wrap_v //wrap vertical and horizontal
{
  //check corners
  x = tempx - range_width;
  y = tempx - range_height;
  iw_distance_up_left = distance_to_object(obj);
 
  y = tempx + range_height;
  iw_distance_down_left = distance_to_object(obj);
 
  x = tempx + range_width;
  iw_distance_down_right = distance_to_object(obj);
 
  y = tempy - range_height;
  iw_distance_up_right = distance_to_object(obj);

  //check left and right
  y = tempy;
  x = tempx - range_width;
  iw_distance_left = distance_to_object(obj);
  x = tempx + range_width;
  iw_distance_right = distance_to_object(obj);

  //check up and down
  x = tempx;
  y = tempy - range_height;
  iw_distance_up = distance_to_object(obj);
  y = tempy + range_height;
  iw_distance_down = distance_to_object(obj);
 
  shortest = min(iw_distance, iw_distance_up, iw_distance_down, iw_distance_left, iw_distance_right, 
                iw_distance_up_left, iw_distance_up_right, iw_distance_down_left, iw_distance_down_right);
}
if do_wrap_h && !do_wrap_v //do_wrap_h
{
  //check left and right
  x = tempx - range_width;
  iw_distance_left = distance_to_object(obj);
  x = tempx + range_width;
  iw_distance_right = distance_to_object(obj);

  shortest = min(iw_distance, iw_distance_left, iw_distance_right);
}

if do_wrap_v && !do_wrap_h //do_wrap_v
{
  //check up and down
  y = tempy - range_height;
  iw_distance_up = distance_to_object(obj);
  y = tempy + range_height;
  iw_distance_down = distance_to_object(obj);

  shortest = min(iw_distance, iw_distance_up, iw_distance_down);
}
if !do_wrap_h && !do_wrap_v
{
  shortest = iw_distance;
}

//return calling instance to original location
x = tempx;
y = tempy;

return shortest;

Let’s take a moment to appreciate this function as it’s written. It’s well-structured, documented, and expressive. First we declare a bunch of variables, then we do stuff with the variables, then we get our answer and return it. And this gives a correct result…

So what’s wrong with the above? It’s an inefficient approach, which checks each virtual position of the wrapping object. If the calling instance wraps vertically and horizontally, it has to temporarily move the calling instance 9 times and check the distance from each of 9 virtual positions, then return it back to its original position, only to return the shortest of those 9 virtual positions.

There’s also a lot of code duplication.

Still, it’s not horrible code. But it’s up to 9x slower than the distance_to_object() function it’s based on, if you’re wrapping in both directions, which will probably be common. I didn’t think that was good enough.

Rather than check each virtual location to see which is the shortest distance, we just need to know whether the horizontal and vertical distances are more than half of the width and height of the wrap region. If they are, then it’s shorter to go around the wrap. To know this, you simply take the x and y values of the two positions, subtract one from the other, and compare to the size of the wrap range. Once you know which virtual position is the closest one, you can temporarily place the calling instance there, and use distance_to_object() to get that distance. Put the calling instance back where it was, and then return the distance.

I realized as well that depending on whether the calling object wraps in both directions, you may not need to check for a wrap shortcut in the horizontal or vertical. So we can potentially avoid doing some or all of the checks depending on whether the do_wrap_h and do_wrap_v arguments are true or false. As well, this means we can avoid declaring certain variables if they’re not needed, which conserves both execution time as well as RAM.

I usually create local script variables in a var declaration, and assign the arguments to them so the code will be more readable, but I wanted to avoid doing that so that this function could be as lean and fast as possible. This might be an unnecessary optimization, but that’s hard to predict since I have no way of knowing ahead of time how this function might be used in a future project. In a project with many wrapping instances, it could very well be called many times per step, and every optimization could be critical. Since the script is intended to be included as a function in an extension, once I have it working properly it shouldn’t be opened for future maintenance, so making the script readable is not as important. So I opted to remove the local variable declarations as much as possible and just use the argument[] variables directly.

Also, to ensure that the wrap range is defined properly, in the non-optimized version of this function, I declare x1, y1, x2, y2 and assign their values using min() and max() so that (x1, y1) is always the top left corner, and (x2, y2) is always the bottom right corner of the wrap range. Technically for this function, we don’t care precisely where the wrap range is, only what the width and height of the wrap range are. That being the case, I can further optimize what I have here, and rather than use min and max, I can just take the absolute value of the difference of these two values.

It turns out that the process I went through to optimize this function is pretty interesting, if you care about optimizing. So I’ll go into greater detail at the end of this article about the approach I took to get there. But for now, let’s skip ahead and look at the finished, optimized function. Here it is, re-implemented, this time doing only the minimum amount of work needed:

///iw_distance_to_object(obj, x1, y1, x2, y2, do_wrap_h, do_wrap_v)

///@description iw_distance_to_object returns the shortest distance in room pixels between two objects in the wrap range, 
///taking into account the horizontal and/or vertical wrap properites of the calling object.
///@param obj the id of the target object
///@param x1 left x boundary of wrap range
///@param y1 top y boundary of wrap range
///@param x2 right x boundary of wrap range
///@param y2 bottom y boundary of wrap range
///@param do_wrap_h set whether the horizontal wrap is on (true) or off (false)
///@param do_wrap_v set whether the vertical wrap is on (true) or off (false)


if !(argument[5] || argument[6]) //not wrapping actually
{
 return distance_to_object(argument[0]);
}
else
{
 //We're going to figure out which virtual position is the nearest to measure from
 //To do that, we have to compare the h-distance and v-distance of the calling instance and the target position
 //If this distance is <half the range size, then the original position of the calling instance is closest
 //Otherwise we have to use one of the virtual positions
 //Then we're going to temporarily put the calling instance in that location, get the distance, and put it back 
 
 //arguments
 var tempx = x, tempy = y;
 
 if argument[5] //do_wrap_h
 {
   var range_width = abs(argument[3] - argument[1]);
   if abs(x - argument[0].x) > (range_width * 0.5)
   {
     x -= sign(x - argument[0].x) * range_width; 
   }
 }
 
 if argument[6] //do_wrap_v
 {
   var range_height = abs(argument[4] - argument[2]);
   if abs(y - argument[0].y) > (range_height * 0.5)
   {
     y -= sign(y - argument[0].y) * range_height;
   }
 }
 
 var d = distance_to_object(argument[0]);
 
 //return calling instance to where it was
 x = tempx;
 y = tempy;
 
 return d;
}

We don’t need to measure all nine distances to know which is the shortest; we can tell by comparing the direct distance to the size of the wrap zone — if it’s less than half as big as the wrap zone, the direct distance is the shortest. If not, then we need to wrap. We can check the x and y axes separately, and if both are called for then we can just combine them.

The second function should be much faster to execute, and uses less RAM. How much faster? Well, let’s do a test project using my Simple Performance Test and compare.

Download the iMprOVE_WRAP distance_to_object test project

It turns out that the improved code runs about 50% faster than the old code! That’s a measurable and worthwhile improvement. Although, that said, the old function ran well enough that I could have released it, and likely it would not have been a problem for many uses, particularly in Windows YYC builds.

Appendix: Optimization through Iteration

(more…)

GameMaker Studio 2 impressions: Object editor

The most notable change in the Object Editor is that sub-windows are “chained” to the main form, in what YoYoGames is calling “Chain view”.

GMS2 Object Editor

The idea is that different parts of the Object editor should all be visible, not overlap each other, connected visually.

The main Object window shows the object’s basic properties: the Name, Sprite, Collision mask, and Visible/Solid/Persistent/Physics properties, as you can see. Chained to it are the object’s Events, and the Code Editor (or DnD Editor) will be chained off of the Events sub-panel. If your object happens to be a Physics object, or has Parents or is a Parent, then the Parent and Physics sub-panels will also chain themselves to the main Object editor form.

GMS2 Object Editor chain

This takes some getting used to, and occupies quite a lot of space on screen, which for users with smaller displays can make it a problem to work with Objects inside of a Workspace.

Fortunately, Object Editor windows, like any other window, can be broken out of the main GMS2 window and maximized, to fill up the entire screen if desired. Users will either love or hate Workspaces and Chain View windows, and if you’re one of the ones who hates them, you’ll need to get used to breaking the editor out into its own window and maximizing it, as this seems to be your only recourse for now. There’s a few Preferences in the Text Editors section that will make this easier for you, should you want to configure them:

GMS2 Text Editor Preferences

The GameMaker Community Forums have been very active in discussing the UX issues created by the new UI, though, so don’t be surprised if YYG do make a few changes in future updates.

DnD or GML?

The Object Editor comes in two flavors: Drag-n-Drop (DnD) and Code Editor (GML). Which variant you get is currently determined when you create a new Project, but you can switch at any time. Most users will probably prefer to create GML projects and work in the code editor, but beginners, younger users, and non-programmers may prefer the DnD option.

Probably the most important feature of either variant is its interface for defining actions in your Object’s events.

I’ll be focusing mainly on the GML version, since that’s what advanced users will use. But briefly, Drag-n-Drop has been completely overhauled in GMS2.

The new Drag-n-Drop system

Vastly expanded in GMS2, there are now DnD equivalents to just about every function in GML. Unfortunately, this means that there are vastly more icons needed to represent all of these new DnD actions, making them harder to learn. Similar to Chinese or Japanese, where every written word has its own symbol, there’s a DnD icon for every GML function. While it’s reasonably easy to pick up a DnD library with a small number of actions, this quickly becomes unwieldy as the number of actions grows. Unfortunately I expect this will have the undesired effect of making DnD too complex to use for beginners and non-programmers, making it questionable how valuable the DnD system will be in the future. Learning to code by typing out instructions isn’t that hard, and is arguably the better way to learn in the first place. But it’s nevertheless true that for certain people, they feel intimidated by programming or typing, and an intermediary step of using DnD like “training wheels” until the new user has an understanding of GameMaker’s fundamentals and is ready to move on to GML, has been one of GameMaker’s defining features.

In GMS1.x and earlier, DnD Actions were iconographic representations of special GML functions that started with action_ for example, action_set_hspeed(number). These functions were mostly redundant, being equivalent to other GML functions and expressions, for example hspeed = number;

The action_ GML functions are obsolete in GMS2, and are no longer needed. DnD Actions can convert directly into GML with a single menu command. This is a one-way conversion, and should help users who want to “graduate” from DnD programming to GML programming. Formerly, in previous versions of GameMaker, there was no way to convert DnD to GML code, other than to manually re-write everything. If you try to convert GML into DnD, rather than a sequence of DnD actions, you’ll get your GML code wrapped up in an Execute Code DnD Action, and the Object Editor will switch to DnD mode, allowing you to continue programming with DnD actions. While not particularly useful for advanced GMS users who are already familiar with programming in GML, it’s a nice improvement to the way the DnD system works.

GML Code Editor

The new GML code editor is still somewhat rough, but shows promise of numerous improvements. Indenting is standardized, to 4 spaces per tab by default, although this is configurable, and there are subtle guidelines showing where tabs will align to in the background. Row lines are numbered, again configurable if you don’t want to see them.

GMS2 Code Editor

The most obvious difference is the new color coding for syntax. This may take a bit of getting used to, but at first I found that my code looked very rainbow-y, and I found this to be somewhat of a distraction at first, but after a few days I found that I had adjusted. Every color is customizable, if you want to bother with that.

Auto-completion and hinting is improved in the new editor. All project variables, macros, etc. are included, not just the built-in GML keywords.

GMS2 Code Editor AutoSuggest

The completion hints at the bottom of the Code Editor window are very helpful to remember all the arguments that must be provided to a function, in the right order. And for any scripts which you author, if you use JSDoc commenting, you can provide hints for your own functions as well.

GMS2 Code Editor Completion Hint

Rough Edges

Cursor navigation keys are either different from standard Windows text editors, or else not yet fully implemented. I’m accustomed to, and very reliant upon, using Home|End|Page Up|Page Down|Shift|Control|Arrows to move the cursor about the window, to select text, and for copy/pasting. In the GMS2 code editor, these keyboard shortcuts do not all work as expected, which can be pretty annoying.

In most text editors, Home and End keys will make the cursor jump to the 0th or last position in a row, or if Ctrl+Home|End is pressed, the 0th or last position in the file. Presently, Home and End do not appear to be supported at all in GMS2.

The Arrow keys move the cursor around the document one character at a time, and if Shift is held down, the characters that the cursor passes over are then selected. Holding Ctrl down will speed the cursor up, moving it a word or a paragraph at a time.

For some reason when selecting text using Ctrl+Shift+Arrow, with the horizontal arrows, the selection gets “stuck” at the beginning/end of a row, and will not advance beyond that unless Ctrl is briefly released. This is a relatively minor annoyance, but should nonetheless be corrected. Normally, Ctrl+Shift and the Left or Right Arrow key will select to the next word, and will wrap lines if it reaches the end of a line.

Up or Down Arrow will move the cursor up or down a row, and with Ctrl+Shift held down, should move up/down to the next blank line. This is standard behavior in pretty much every text editor I’ve used in Windows, or Mac OS for that matter, but it is not the behavior in GMS2 at the time of this writing. I am hopeful that this will be addressed before the end of the Beta.

But by far the biggest thing that users are complaining about in the Community Forums has been the way the IDE wastes space in its default configuration, due to the way Workspaces and the Chain View UI work. Fortunately, breaking out the Code Editor into its own, maximized window is an easy workaround to this problem, and largely addresses it to my satisfaction.

Apart from these issues, I like the new UI for the Object Editor, and the Code Editor very much.

GameMaker data structures: a cautionary tale

When you work with data structures in GameMaker, you have to be very careful with references to a data structure that has been destroyed.

When you create a data structure in GMS, the ds_*_create() function returns an integer value which is the id of the data structure. You then use this id whenever working with that data structure.

When you destroy the data structure, this frees up the memory that the data structure used, and the data structure can no longer be accessed.

If you take that id that belonged to the destroyed data structure, and test to see if the data structure exists, using the ds_exists() function, it should return false.

The operative word being “should”. It might not.

Why not? Because, the GameMaker runtime reuses the ids of data structures, and if you create a new data structure, it will hand out that id that belonged to the data structure that was just destroyed.

To illustrate the example, we’ll use a ds_stack:

var a = ds_stack_create();
ds_stack_destroy(a);

var b = ds_stack_create();
show_message(string(ds_exists(a, ds_type_stack)));

You would think that ds_exists(a, ds_type_stack) would return false. But it doesn’t, because ds_stack b just reused ds_stack a‘s old id.

Apparently, the correct practice — which is not mentioned in the manual — is to immediately clear the value of a after destroying the ds_stack that it points to, like so:

ds_stack_destroy(a);
a = undefined;

If you do that, then a no longer points to an address that can potentially be assigned to new data structure, and so you’re safe, even if b has the same address as a once did.

Of course there’s still a problem if multiple variables all point to that same destroyed data structure. This is probably a somewhat rare circumstance, but could possibly by the case in some circumstances, for example if you have a global variable, or controller object, holding a data structure that is accessed by multiple instances of some common object. Keeping track of every variable that references the destroyed data structure and clearing all of them when the data structure is destroyed is not an easy thing to do.

Update: Thanks to @YellowAfterLife for the very clever tip!

In other words, do this:

//creation of stack:
a[0] = ds_stack_create();
//aliases to the stack
b = a[0]; //copy of stack id stored in a[0] -- don't do it this way!
c = a[@0]; //reference to stack id stored in a[0]

//destroy the data structure AND clear the variable
ds_stack_destroy(a[0]);
a = undefined; // this destroys the array a[], and therefore kills all references to the ds_stack.

//create a new stack, let's see what happens with our aliases
d[0] = ds_stack_create();

ds_exists(a[0], ds_type_stack); //returns false, because the array was destroyed.
ds_exists(b, ds_type_stack); //returns true, but misleadingly so, because when we created d[0], 
 //we re-used the same id that had been used by the stack referenced by a[0], 
 //and copied to b by value. 
ds_exists(c, ds_type_stack); //returns false, because c references a[0] rather than storing a copy of the id it had stored.
ds_exists(d[0], ds_type_stack); //returns true, because we created ds_stack d[0].

It’s debatable whether the re-use of handles like this is in fact a good practice, but at the moment it’s the way GameMaker works, and has worked, for years. But the discovery that they are re-used (and so soon after being destroyed) is a bit of a shocker.

More information.

Fun enum ideas for game development

Most video games have a counting, ranking, or level system of some sort. It’s often good to have a thematic flavor to your counting systems. This way, rather than calling your level progression by boring old regular numbers, you can give each level number a meaningful, or flavorful, name. This can add character or meaning to your game world, or it can be used to help disguise the underlying math, resulting in a game where the underlying mechanics are masked away from the player, leading to a more mysterious experience where they need to experiment and discover. What’s cooler: a “level 3 sword?” Or “the sword of autumn?” What’s more powerful: the knight sword or the rook sword?

To that end, I thought I’d demonstrate a few example enums that you can use to spice up your game design.

ENUMerate all the things!

Alphabet {A, B, C, D, E, F, G, H, I, J, K, L, M, N, O, P, Q, R, S, T, U, V, W, X, Y, Z}

Greek Alphabet {Alpha, Beta, Gamma, Delta, Epsilon, Zeta, Eta, Theta, Iota, Kappa, Iota, Kappa, Lambda, Mu, Nu, Xi, Omicron, Pi, Rho, Sigma, Tau, Upsilon, Phi, Chi, Psi, Omega}

Military Phonetic Alphabet {Alpha, Beta, Charlie, Delta, Echo, Foxtrot, Golf, Hotel, India, Juliett, Kilo, Lima, Mike, November, Oscar, Papa, Quebec, Romeo, Sierra, Tango, Uniform, Victor, Whiskey, Xray, Yankee, Zulu}

Army (simplified) {Private, Specialist, Corporal, Sergeant, Officer, Lieutenant, Captain, Major, Colonel, General}

Navy (simplified) {Seaman, Petty Officer, Ensign, Lieutenant, Commander, Captain, Admiral}

Chess {Pawn, Knight, Bishop, Rook, Queen, King}

Rainbow {Red, Orange, Yellow, Green, Blue, Indigo, Violet}

Elements {Earth, Air, Fire, Water}

CardRank {Two, Three, Four, Five, Six, Seven, Eight, Nine, Ten, Jack, Queen, King, Ace, Joker}

CardSuit {Clubs, Diamonds, Hearts, Spades}

Zodiac {Aquarius, Pisces, Aries, Taurus, Gemini, Cancer, Leo, Virgo, Libra, Scorpio, Sagittarius, Capricorn}

Seasons {Spring, Summer, Autumn, Winter}

Months {January, February, March, April, May, June, July, August, September, October, November, December}

Weekdays {Sunday, Monday, Tuesday, Wednesday, Thursday, Friday, Saturday}

Lunar Cycle {New, WaxingCrescent, FirstQuarter, WaxingGibbous, Full, WaningGibbous, ThirdQuarter, WaningCresent}

Some of these may not necessarily have a natural order to them, but might just be a set of categories which you could use to organize something in your game. That something could be worlds, or items, or creature types, or powers, or anything else you can think of.

What else?

What else is there? Probably a whole lot! You could probably make a good basis for a game system out of gemstones, or metals, or barnyard animals, or anything, really!

If you know of a set of things that would make a good enum that I’ve left out, leave a comment below.

Using enums in GameMaker Studio

Enums are covered in the manual in the article on Data Types.

The basic syntax is as follows:

First, you have to declare the enum.

enum <variable>{<constant> [= <value>]}

You create the enum using the enum keyword, naming the enum <variable>. Then, in brackets, you list all the constants that make up the values in the enum. You can explicitly declare values for the enum constants, or you can leave them implied, in which case GameMaker will assign them integer values starting at 0, and increasing in order through the collection. You can even use expressions rather than a static value.

To access the enum constants, you use the syntax enum_variable.constant.

In your code, there are all kinds of situations where using an enum is potentially useful. Here’s a few things to look for in your code that might signal a good opportunity to use an enum:

Conditionals for checking state

Consider the following ways of checking the state of some object:

//check state using string matching
if state == "state_idle" {//do state actions}
//check state using literal numbers
if state == 0 {//do idle actions}
//check state using variable
state_idle = 0;
[...]
if state == state_idle {//do state0 actions}
//check state using enums
if state == enum.value {//do state actions}

Out of these, using enums is the best approach. Why are enums better?

Conditional checking by string matching is much slower than number matching. Your string value provides semantic meaning to the reader, making the code easier to understand when a human reads it. But when the program goes to check the conditional, it has to check every letter in both strings to see if they match.

As well, this approach is fairly error prone. It’s very easy to type the strings in slightly wrong. If you’re not careful, it’s easy to type one string where the state is assigned, and another string value where you’re checking state in order to do something state-specific. If you don’t catch the error, you’ll have a hard to diagnose bug because the conditional check won’t match what you’ve set the state variable to. One extra space, or misspelled word, or inconsistent use of capital letters, and the string match check will fail. The compiler won’t help you catch this sort of bug.

It’s a lot faster to do conditional checking via numbers. But naming your states with literal numbers: 0, 1, 2, etc. provides no meaning. Is 0 the idle state? is 1 running? is 2 jumping? Keeping track of this stuff in your head makes your work as a programmer harder, and makes the code hard to read, and brittle. You can do slightly better by creating a named variable and assigning the number value to it. The named variable can be expressive, e.g. state_idle = 0, state_running = 1, etc. But variables values can change, and storing each value takes a little bit of memory. By contrast, an enum value is constant — it cannot be changed once it is declared. And enums are global, so they are only declared and set in memory once, and thus require fewer resources. Even if you have ten thousand instances that use your enum, the memory used by them is the same as if there is only once instance.

Create an enum that provides expressive labels on these values, and you have the best of both worlds: expressive code that checks conditions fast, and uses computer resources efficiently.

Iteration over a set

Conventionally, programmers often rely on conventional looping variable names such as i or j to iterate over a collection of things, such as the members of an array, or other data structure. While this is OK, you can make your code more expressive by using enums to denote important numbers.

For example, it’s common for programmers to use a nested for loop iterating over the variables i and j to create a grid structure. Instead of using i and j, we can use variables named row and column instead. As we iterate over the range of rows and columns, we can use enums as flags to do something special at row (or column) == enum.constant.

Another example:

Say we want to implement an inventory equipping system for the player. The character has inventory slots for head, body, gloves, right hand, left hand, shoes. We decide to create an array, called inventory[], and assign the equipped item in each slot.

We could simply index the array with numbers:

inventory[0] = hat;
inventory[1] = armored_breastplate;
inventory[2] = iron_gauntlets;
inventory[3] = sword;
inventory[4] = empty;
inventory[5] = double_jump_boots;

Now, it’s not too hard to tell what each inventory slot is for. But it’s not as easy as it could be, either. Is the sword in the left hand or the right hand?

Let’s use an enum, and make the code easier understand.

enum inv_slots{head, body, gloves, right_hand, left_hand, shoes};

inventory[inv_slots.head] = hat;
inventory[inv_slots.body] = armored_breastplate;
inventory[inv_slots.gloves] = iron_gauntlets;
inventory[inv_slots.right_hand] = sword;
inventory[inv_slots.left_hand] = empty;
inventory[inv_slots.shoes] = double_jump_boots;

Now, it’s quite easy to see that the double_jump_boots are being worn on the player’s feet, rather than being carried in the player’s hands. It’s simple to keep track of which slot is which.

Creating a set of related, named values

Here’s a useful enum for direction angles for a top-down game:

enum compass {e = 0, ne = 45, n = 90, nw = 135, w = 180, sw = 225, s = 270, se = 315};

It’s much easier to remember and understand direction = compass.sw instead of direction = 225. You can use this enum for 4-direction and 8-direction movement or aiming, and you could even expand upon it if you wanted by adding constants for ene, nne, nnw, wnw, wsw, ssw, sse, and ese, like so:

enum compass {
 e = 0, 
 ene = 22.5, 
 ne = 45, 
 nne = 67.5, 
 n = 90, 
 nnw = 112.5
 nw = 135, 
 wnw = 157.5
 w = 180, 
 wsw = 202.5
 sw = 225, 
 ssw = 252.5
 s = 270, 
 sse = 292.5
 se = 315,
 ese = 337.5
 };

(I like to format my code like this; lining up the variable names, equals signs, and values makes it easy to scan down the file, and makes it clear that these values are all related.)

If I wanted, I could go a step further and use radians to make it clearer that these values are fractions of a circle:

enum compass {
 e = 0, 
 ene = radtodeg(pi * 0.125), 
 ne = radtodeg(pi * 0.25),
 nne = radtodeg(pi * 0.375), 
 n = radtodeg(pi * 0.5), 
 nnw = radtodeg(pi * 0.625),
 nw = radtodeg(pi * 0.75),
 wnw = radtodeg(pi * 0.875),
 w = radtodeg(pi), 
 wsw = radtodeg(pi * 1.125),
 sw = radtodeg(pi * 1.25),
 ssw = radtodeg(pi * 1.375),
 s = radtodeg(pi * 1.5),
 sse = radtodeg(pi * 1.625,
 se = radtodeg(pi * 1.75),
 ese = radtodeg(pi * 1.875)
 };

You can group together, and name other values that go together in a system using enums in this way, too.

Parting thoughts

Hopefully, these examples will help you see how enums can be useful to make your code more expressive, easier to read, and easier to maintain. Look for opportunities to use them in your code. They can really help!

GameMaker Studio 2 impressions: New Project

[Rather than posting a long article that takes days to organize, I’m opting to do short-form posts that focus on a narrow aspect of the new GameMaker. This means more frequent, smaller posts, which will hopefully be more timely and more digestable for readers. For more articles in this series, just follow the GameMaker Studio 2 tag.]

If I click on New Project, I have to choose between creating a Drag & Drop project or a GameMaker Language project.

GMS2: Create new project

Weird; I can’t use both in the same project anymore? [I haven’t actually created a new project yet; I don’t know. But that seems to be the implication here.]

Really, I expect that most GMS users use GML, but I’m glad that they’re keeping DnD, because for beginners and non-programmers it is much easier to learn. And it looks like they’ve really improved the Drag-n-Drop system by leaps and bounds over what it’s been up until now. (I’ll cover this in a separate post in more detail…)

But I think it’s odd that I have to pick between one or another coding system when I create my project.

Really, what I had hoped for was that there would be a “Convert DnD to GML” button that users could use, and this could facilitate learning how to code in GML by starting out in DnD, then converting to GML and seeing what it generates for you. I don’t know whether this is a feature that YYG have planned or not, if it is I haven’t discovered yet. Or, even better than a one-way conversion, YYG could have made DnD and GML completely equivalent, such that there was full coverage of the entire GML language with DnD actions, and allowed the developer to switch between views, viewing the code as visual drag and drop actions, or as GML code, and develop however they’re more comfortable at the moment.

I think this “one or the other but not both” approach could potentially cause problems, and will result in pushing users to using GML-only. When a new programmer begins to learn GML, at first they typically start out by going through a project they’ve created using DnD, and replacing the DnD actions an instruction at a time with equivalent GML. If you can’t do that in GMS2, it will make transitioning that much harder, because you would have to start a new project, and code exclusively in GML, before you’re totally ready. Rather than make a gradual transition to becoming a GML coder, the neophyte GMS2 developer will need to develop sufficient confidence in their understanding of GML to start a new project from scratch and use it exclusively.

This pretty much destroys GMS’s gentle learning curve that makes it great for first-time programmers. Update: GML-DnD conversion is exactly how it works! Right-click in the object-editor and there’s an option to convert from DnD to GML, and vice versa.

DnD to GML

GMS2 allows you to convert DnD directly to GML, and GML can be converted to DnD (it just shoves the GML code into an Execute Code DnD action, so it’s only semi-reversible).

Oddly, the DnD2GML conversion warns you that this is a one-way change, but that is apparently not the case (although converting GML to DnD simply puts the GML code into an Execute Code DnD action).

I suspect that many users look down at DnD disparagingly, but really there’s nothing wrong with using it. It’s quick, and if it’s all you need, it’s all you need. For what would be a simple, one-liner GML script, I often opt to use DnD when I’m in a hurry, because it’s expedient.

Simple GameMaker performance throttling

Here’s a quick tip for performance throttling in GameMaker.

Say you’ve got some code that you need to execute frequently, but if the game starts slowing down too much, you can live without executing this block of code.

Like, for example, say you want to spawn a new instance of some object very frequently, such as in the Step event, but if performance starts to lag you can skip it. You could try to test out how many instances the game can handle without frame rate dropping to an unacceptable level, and cap the number to something somewhat below the maximum. The problem is that this number will vary depending on the hardware. Someone running your game on an older, slower machine will not be able to sustain the same performance that someone with a brand new, high end machine. There really isn’t a true, one-size-fits-all number that works for every situation.

What you really want to do is base the cap on the current performance of the game as it’s running right now. To do that, wrap it up in an if statement like this:

if room_speed < fps
{
 //keep doing the thing that will eventually cause performance issues
}

The way this code works, as soon as fps drops below room_speed, it will stop doing the thing that contributes to the performance problem. This technique does not guarantee that fps will never drop below room_speed, but it will cause performance to stop degrading by not contributing to the problem once performance has degraded to the point that the conditional check takes the “false” branch.

If you don’t want ANY noticeable performance degradation, you may want to make the conditional check be something more like

if (room_speed + 10) < fps

instead; this will give you a little buffer to keep the fps enough above room_speed that you should not see any noticeable performance problems. Or, substitute the calculation room_speed + n with the literal value that you don’t want fps to drop below. Use this to ensure a safer margin of acceptable GameMaker performance.